Showing posts with label Crafty Creators. Show all posts

Crafty Cards


We've got some family birthdays coming up in the next month, and they are almost all men, except for one, my granddaughter, so I went from making a masculine card to making a baby's birthday card.

I had to "ink" out her name


The baby girl this card is for is this little cutie (who just woke from a nap in this picture)!

Quite opposite cards, but basically the same supplies:

Don't forget to visit Crafty Creators for more inspiration!

(Some of these links are affiliate links which means if you make a purchase, I may receive a small compensation at no cost to you.  FYI:  Amazon's Labor Day Sale has begun.)

Christmas in August?


I attended a Christmas card craft summit last weekend which truly inspired me, so I have been crafting cards like crazy!  Watching other people craft gets my own creative juices flowing. This is the card I like best out of what I have created so far.


I love the vellum, the ink blending, the pearls, and the non-traditional colors.  Here are the materials I used to create this card

Cardstock

Vellum

Faux pearls

Cricut Machine

Cricut metallic pen

Distress Oxide ink pad

Dye ink pad

Ink Blending Brushes

Adhesive double-sided tape runner

Cuttlebug (retired - any die cut machine should work for embossing)

Embossing Folder

Visit Crafty Creators for more crafty fun!


affiliate links - If you choose to purchase from my links, I may make a small commission at no cost to you.

Feeling Crafty

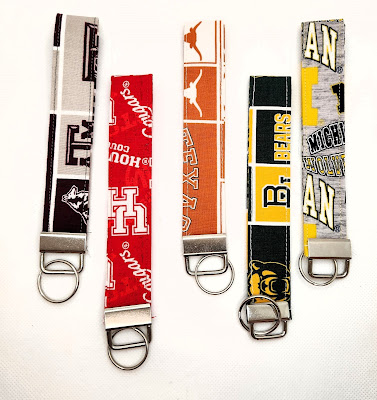
 This week, I spent some time making college keychains with all of the university fabric I could find locally.  I made keychains for Texas A&M, University of Houston, University of Texas, Baylor University,  and University of Michigan (I know, right?)  Check them out on Etsy!  I plan to look for a few more popular schools like Alabama and LSU.  I'm going to take custom orders for teams that aren't listed here, but I will have to price the fabric first.

They are really fun to make.  If you're interested in making one for yourself, I will be happy to give you the details.  Just send me a message.

I've also been practicing drawing and watercolor just for fun.  Here is a card I did.  My sister loves elephants, so she will be getting this one.


How has your crafty week been?  Check out Crafty Creators for more inspiration!

Christmas in July Craft


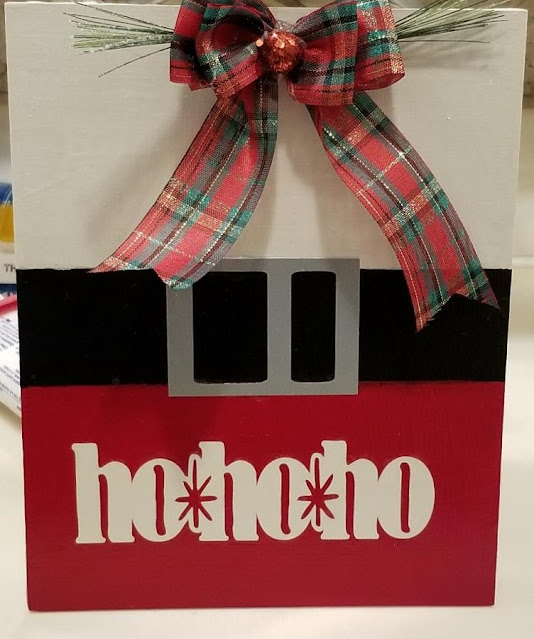
 Today I want to show you a really cute and super simple craft... a "Ho Ho Ho" sign.


1. Gather your materials.

2. I used an 8x10 thin wooden panel board.  Paint  half your board with  white acrylic paint and the other half with red leaving some blank space in between them.  Let dry. Repeat.  (Clean your foam brush before moving to another color, or have a dedicated foam brush for each color.)  I pour my acrylic paint onto a paper plate instead of a palette so I can throw it away when I am finished.

3.  Use painter's tape (and a ruler to make sure you put it on straight) to mark where you want the black "belt" to begin and end.  Paint the belt black. Let dry. You may want two coats. When everything is completely dry, carefully remove the painter's tape.

4.  I cut the silver buckle on my Cricut, but you could fussy cut it or make a different type of belt, but we all know Santa needs one.

5.  I cut the words "Ho Ho Ho" with Cardstock using my Cricut Explore Air 2, but you can use any cutting machine.  I chose to make it white, but you could also use black or silver.  Use Mod Podge to adhere the words to the bottom section.  Apply with a clean foam brush.  Go over the entire board with Mod Podge.  Let dry. Repeat.

6.  Add a bow and greenery at the top using hot glue.  I added an optional mini-ornament to the bow.

7.  Use a staple gun to attach a piece of twind or ribbon for a hanger.  Place the middle of the length of ribbon or twine on the center back of the board.  Tie the loose ends in a knot, and that's it!


Here is my list of supplies (Affiliate Links)

8x10 Birch panel

Acrylic paint in red, black, and white.

Sponge foam brush

Painter's Tape

Silver cardstock

White cardstock

Cricut Explore Air 2

Standard Grip Cutting Mat (This pack of 2 is on sale now for 50% off!)

Mod Podge

Christmas Ribbon - I had on hand

Christmas greenery - I had on hand

Twine or ribbon

Visit Crafty Creators for more inspiration!


Handmade Card

I'm linking up with Crafty Creators.

 Here is a card I made for my sister's birthday.  


Materials Used:

Folded card with envelope.  Card measures 4.25x5.5 inches.
Misty Morning Paper Pad by Recollections (from Michaels)
Solid white and light blue cardstock from Recollections Essentials
Embossing folder for the white vertical piece
Square punch for the light blue paper
Blue ink pad to ink edges
Blue Cricut pen for sentiment
Blue fibers I had on hand
Cricut for cutting shapes. I used a maker, but you could also use an Explore.
Butterfly clear stamp that I got from Scrapbook.com

These are Amazon affiliate links which means if you decide to make a purchase through one of my links, I may get a small commission at no extra cost to you.

Recent Crafts

 I have been having so much crafting fun this week!  I've been working on some paper projects for my twins' upcoming birthday.  These aren't my designs, so I won't include them in my Etsy shop, but I thoroughly enjoyed creating them.  I will link the designers below this post so you can get the files, too.  They are FREE! (You may have to sign up for a newsletter, but otherwise, no cost except your own materials.)


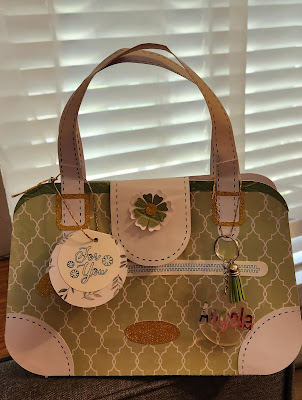
Paper purse - It is actually a purse with an outside pocket and an inside pocket and a Velcro closure.

This is the front


This is the back

Paper wallet that I will be using as a gift card holder.  It also has a Velcro closure.


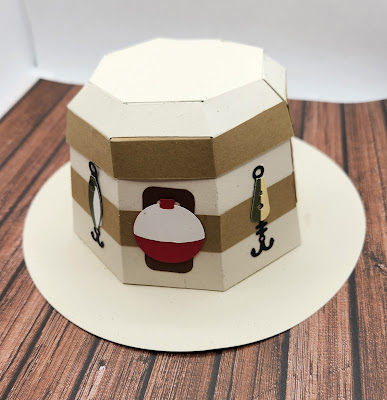
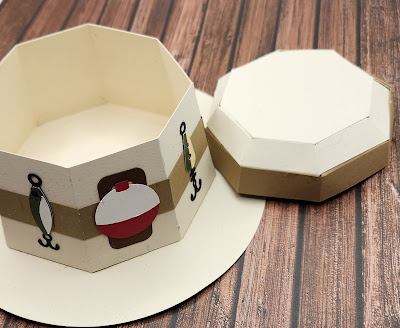
This fisherman's bucket hat can actually be used as a gift "bag."  


Surprise!  The top comes off.  Isn't that clever?

I can't wait to fill them with gifts and give them to my kids.

And if you need a last-minute, inexpensive, printable greeting card for Father's Day, here are two options:
Tools


Mustache

Printable cards are great!  Print, fold, crease, done!  Have a great weekend!

Paper purse and wallet can be found at Jennifermaker.com Design 393.
Paper bucket hat can be found at
Visit Crafty Creators for more inspiration!


Home Decor Family Word Search


 Have you ever watched the Christmas movie The Polar Express?  Remember when he declares, "The first gift of Christmas!"? 

That's what I wanted to shout a couple of days ago (shortly after watching part of the movie) when I completely finished my first homemade gift for one of our daughters.  I've started on several, but this one was the only one completed.  Whoops.  That's not 100% true.  It's the first Cricut project completed. I finished a sewing project last week.  Here it is!
I blacked out the family name to protect their privacy.

First, I must say that this is NOT my design!  I got the design from Jennifer Maker during her Cricut Academy Weekend.  I think it's perfect for our daughter's family, and I hope they will be able to hang it up with pride (even though I think it's a smidge crooked.  Just a smidge, but I tend to want things to be perfect.) The cool thing about this project is that the vinyl is placed directly on the back of the glass!

Hope you like it, and maybe it sparks some creativity.

Materials Used

11x14 glass picture frame

Cricut Premium Vinyl in black and red

Cricut Transfer Tape

Cricut Scraper

Cricut Brayer

Cricut Pen

Cricut Maker  (will also work on Explore)

12x24 Cricut Cardstock Sampler

12x24 Cricut Standard Mat

12x12 Cricut Standard Mat

1 piece of parchment paper

The SVG file from Jennifer Maker


I'll be linking up with Crafty Creators and Friendship Friday.

(Above are affiliate links which means I may earn a small commission if you decide to purchase something.  It will not affect your cost.  This is NOT a sponsored post.)

P. S.  I have not listed this project in my Etsy shop because I only have personal rights to the file.  Besides, it is a time-consuming project that is cost prohibitive to make and ship.  But I still love it!


I've found another blog hop for crafters called Christmas Crafts and Decor at Grammy's Grid.  Take a look!

Make a Cute Drawstring Bag

 Drawstring bags are handy to have around the house.  You can put so many different things in a drawstring bag such as candy, office supplies, makeup, craft supplies, game pieces, pretty much anything!  You can even use them to in place of wrapping paper.  How cute is a drawstring bag under the tree?


This bag started off as 2 8x10 rectangles of fabric. 


With right sides together and using a straight stitch, sew from 2 inchs below the top all along the side, bottom, and up the other side stopping at 2 inches before the end.

Press your seams open.  Next you sew the seams on the split top of each side.  

Next, you fold down the top of each side 1/4 inch and press.  Then you fold again about one inch to make the casing.  Sew a straight stitch as close to the casing edge as you can. 

 Clip the bottom corners on an angle so when you turn it around, you can poke out the corners where they look nice.  Just be sure not to clip so close that you clip the stitches. Give it a good press.  Now it's time to add your drawstrings.  I used bias tape that I had sewn closed.  You can use a fancy tool to push the drawstring through the casing, but I have found that a safety pin words just as well.  You need two 24 inch lengths of cord or ribbon.  You will start on one side, pulling the casing through, then continue pulling the same string through the other side.  You repeat that with the second string starting on the opposite side.  You can then tie the ends together or sew them together. 


And that's all there is to it! 

  If you like it, give it a try!  Or, you could purchase a handmade drawstring bag from Etsy.

For more inspiration, visit Happiness is Homemade, Crafty Creators, and Friendship Friday.


Hanging Wall Pockets


A few days ago, I was looking through Amazon trying to find something I could hang on the wall of my craft room that had pockets.  I had been using my daughter's old hanging jewelry organizer. It was working okay, but I decided to reorganize my supplies to be more efficient, and it was simply taking too much room.  As I searched Amazon and Google shopping, I realized I could make something!  So, I did.  These are the fabrics I used.

Pink print at the top as pockets, pink roses for the main front, and solid pink for the slip pocket and back.

I didn't create a pattern.  I just knew I wanted to start with 12x14 fabric, one for the front, and one for the back.  I knew I needed interfacing, so I ironed it on the wrong side of the front fabric.  I wanted four pockets, and I wanted them shaped like the bottom half of a stop sign, like this...

This would give them some shape and more room because instead of sewing it down in that shape, I scooted the sides in until they were almost vertical, pinned, and sewed.  I decided I wanted a slip pocket at the bottom.  I just ironed some interfacing in between two 12 inch wide pieces of fabric then sewed some leftover bias tape along the top edge of the pocket.


I decided to make ribbon tags to hold the woodent dowel, and I used the ribbon as a hanger as well.  When the four pockets were finished and the ribbon tags pinned.  I put the two main pieces with right sides together and sewed all the way around the rectangle except for a small space to use for turning.


After sewing and turning, I pressed my wall hanger.  Then I topstitched about 1/8 inch all around making sure to catch the open seam I had used to trim it. I love how it turned out!  All I had to do was put the dowel through the tabs then take one long piece of ribbon and tie it to both ends.  It's ready for hanging!


The exact materials are listed below.  They are affiliate links meaning if you choose to make a purchase, I may receive a small commission at no cost to you.  This is NOT a sponsored post.

Materials:

front fabric 12x14

back fabric 12x12

4 smaller pockets with 3 inch bottom (came from the same bundle as front fabric)

slip pocket fabric (same as back) 12x4.5

Bias Tape (optional.  I already had some that matched)

Interfacing

Grossgrain ribbon

Wooden Dowel 12x3/8 inch

Thread that matches

Sewing Machine

Fiskars Fabric Scissors

Press Perfect Hot Ruler (This might be my favorite sewing supply.)

Pins or Clips

Iron and Irony Pad or Board

For other crafty posts, link up with Crafty Creators or Happiness is Homemade.

My First Post - Key Fobs


Hello!  Welcome to my new craft blog, Crafteverly!

If you know me from my personal blog, Forgetfulone, you know I love to craft!  I enjoy sewing, Cricut , wood, vinyl, paper, and so many other types of crafts, and I love creating  digital items as well.

I've finally opened an Etsy shop, but I only have two digital products uploaded so far, but I'm working on it!  Right now, I want to show you a key fob I made to support my hometown team the Astros.  You can make it using any fabric.  I just happened to have this fabric from when I worked part time at Jo Ann.
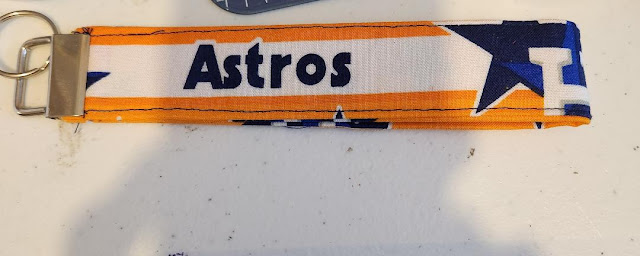

I also have to take better pictures before putting them in my shop!

This is super easy to make.  You need the following:

12x4 piece of fabric

12x4 piece of lightweight, fusible interfacing

iron and ironing board or ironing mat

any sewing machine

thread

key fob hardware

pliers

First, you iron the interfacing onto the wrong side of the fabric.  Next fold the fabric in half longways and press.  Open it back up.  Fold one side of the fabric in toward the middle and press.  Repeat on the other side.  Now fold in half again and you should have fabric that is 12x1 with all the raw edges on the inside.

Now take it to the sewing machine and sew a 1/8" straight stitch all the down the open side to close it up.  Then sew a 1/8" straight stitch down the other side so they match.  Now fold in half bringing the two ends with raw edges together.  Baste the key fob in place where the two ends meet.

The last thing to do is to use your pliers to attach the hardware to the fabric making sure not to scratch the hardware.  I used pliers that were made for this purpose as they have a rubber tip on them.  Add keys, and you're good to go!

Here are some others I made:

Thank you for visiting, and visit Crafty Creators and Friendship Friday for more crafting fun.


Links for materials are affiliate links to the exact products I used.  If you choose to purchase from one of my links, I may receive a small commission at no cost to you.  This is not a sponsored post.